Google Business Messages (Public Beta)
Warning
Public Beta
Google Business Messages is currently available as a Public Beta product. This means that some features are not yet implemented and others may be changed before the product is declared as Generally Available. Beta products are not covered by a Twilio SLA.
Google Business Messages ("GBM") lets users contact your business directly from Google Search, Google Maps and other entry points of your choosing. Using Twilio's APIs, you can engage with your users right where they are. GBM chats happen on Google's Messages app on Android, and through Google Maps on iOS.
GBM is available as a channel in Twilio Flex, Conversations API and Programmable Messaging API. Google does not charge any underlying fees. Pricing for each Twilio product applies - refer to each product's pricing page for more info.
- Google Business Messages ("GBM") is a user-initiated channel, which means that end users have to reach out to your business before you can respond. You cannot start conversations with users who have not contacted you.
- You can send messages to users for up to 30 days after the last message they sent you. You may use this 30-day window to send notifications.
- GBM is not a phone number-based channel; instead, each user has a unique ID that protects their identity.
- Once you launch Google Business Messages, you will be expected to respond to customers quickly. We recommend using a bot - Twilio Studio lets you get started quickly.
- Google requires that you make human escalation available if your customers request it. While you do not need to have a bot or human escalation process set up to test, you should plan accordingly before launching. For human escalation, we recommend Twilio Flex.
Twilio supports inbound and outbound text and media (JPG, JPEG, PNG). Only 1 media file can be transmitted per message. Google Business Messages inbound message Context is available in the webhook field "ChannelMetadata". This includes any Google Maps place IDs, the entry point identifier, the user's display name, the device locale and the resolved locale.
The process to onboard onto Google Business Messages works as follows.
- Create a test sender: Submit a sender request and get a sender that you can test with right away.
- Test your sender: Test your sender, connect it to your bot and/or agent workflows, and get ready to launch.
- Verify your sender: Grant access for Twilio to message on your behalf using GBM. (5-10 business days)
- Launch entry points: Enable the "Chat" button on entry points of your choice, such as Google Maps or Search. (2-5 business days)
Please note that the estimated times provided above may vary depending on demand for GBM. Throughout the Verify and Launch steps, Twilio will be in touch with you via to guide you.
Info
Twilio supports independent software vendors (ISV) and software integrators (SI) or signing up for GBM on behalf of their end clients. Please onboard only a single brand per Twilio Account Sid or Subaccount Sid.
Setting up a test sender for GBM is a self-serve process. In the Twilio Console, navigate to Channels > Google Business Messages and create a new brand and new sender. If you can't locate Channels, please use the "Explore Products" page.
- The "brand" will usually be the name of your company. This is visible to you, Twilio, and Google, but will not be shown to end users. Twilio recommends using only one brand per Account Sid or Subaccount Sid. If you create more senders in the future, you can reuse the same brand.
- A "sender" is the address used to interact with the business (analogous to a phone number). The sender name will be visible to end users. Please note that Google calls the "sender" an "agent".
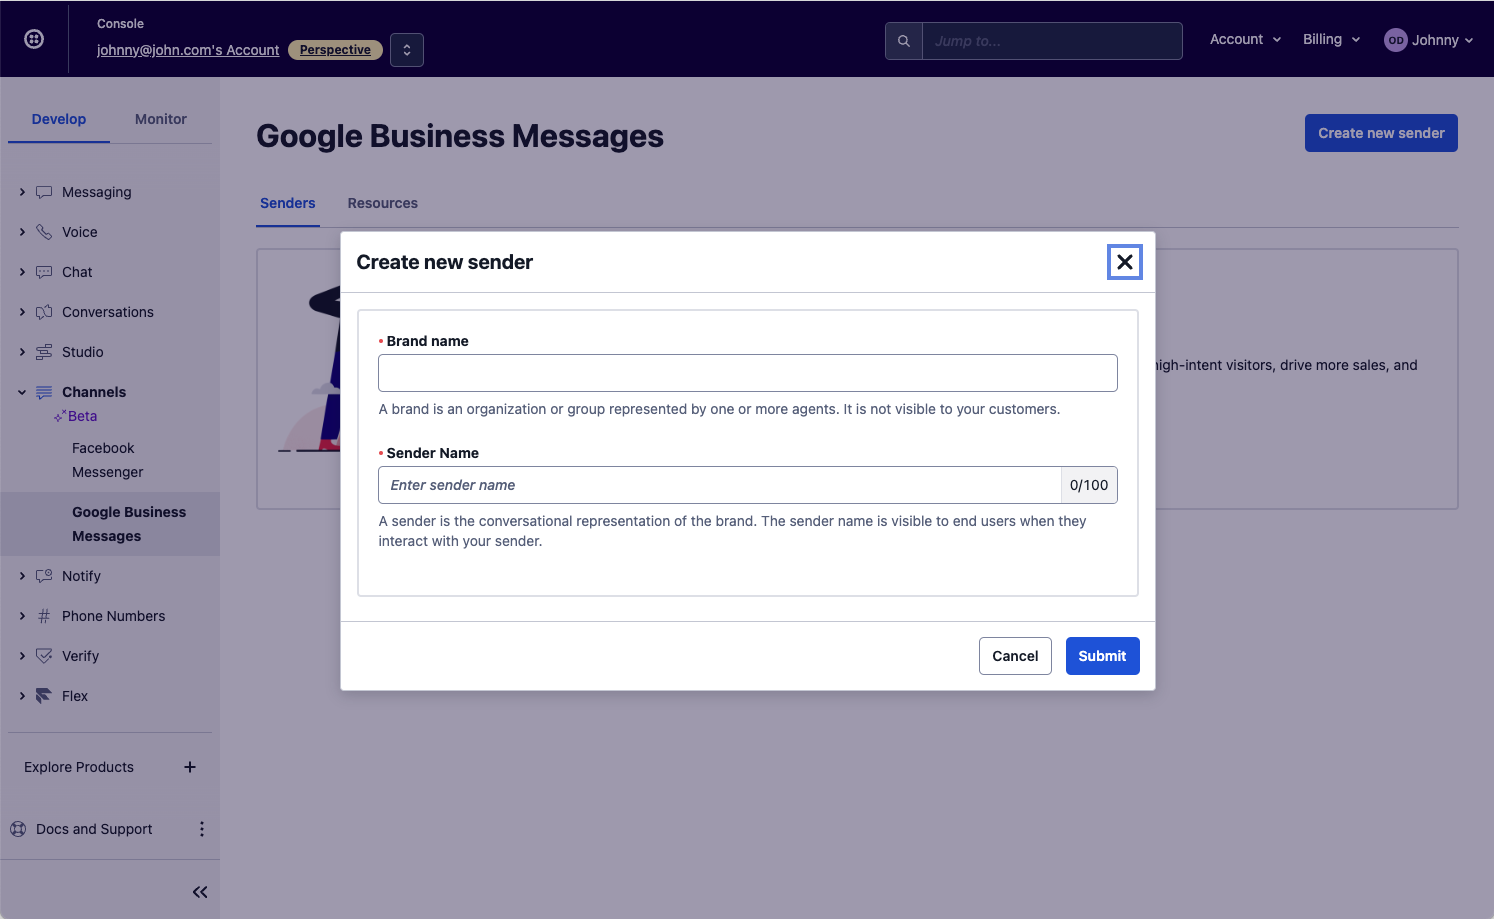
Once you submit agree to the Google Terms of Service and submit the brand and sender names, Twilio will create a GBM sender for you. The sender status will be "Draft".
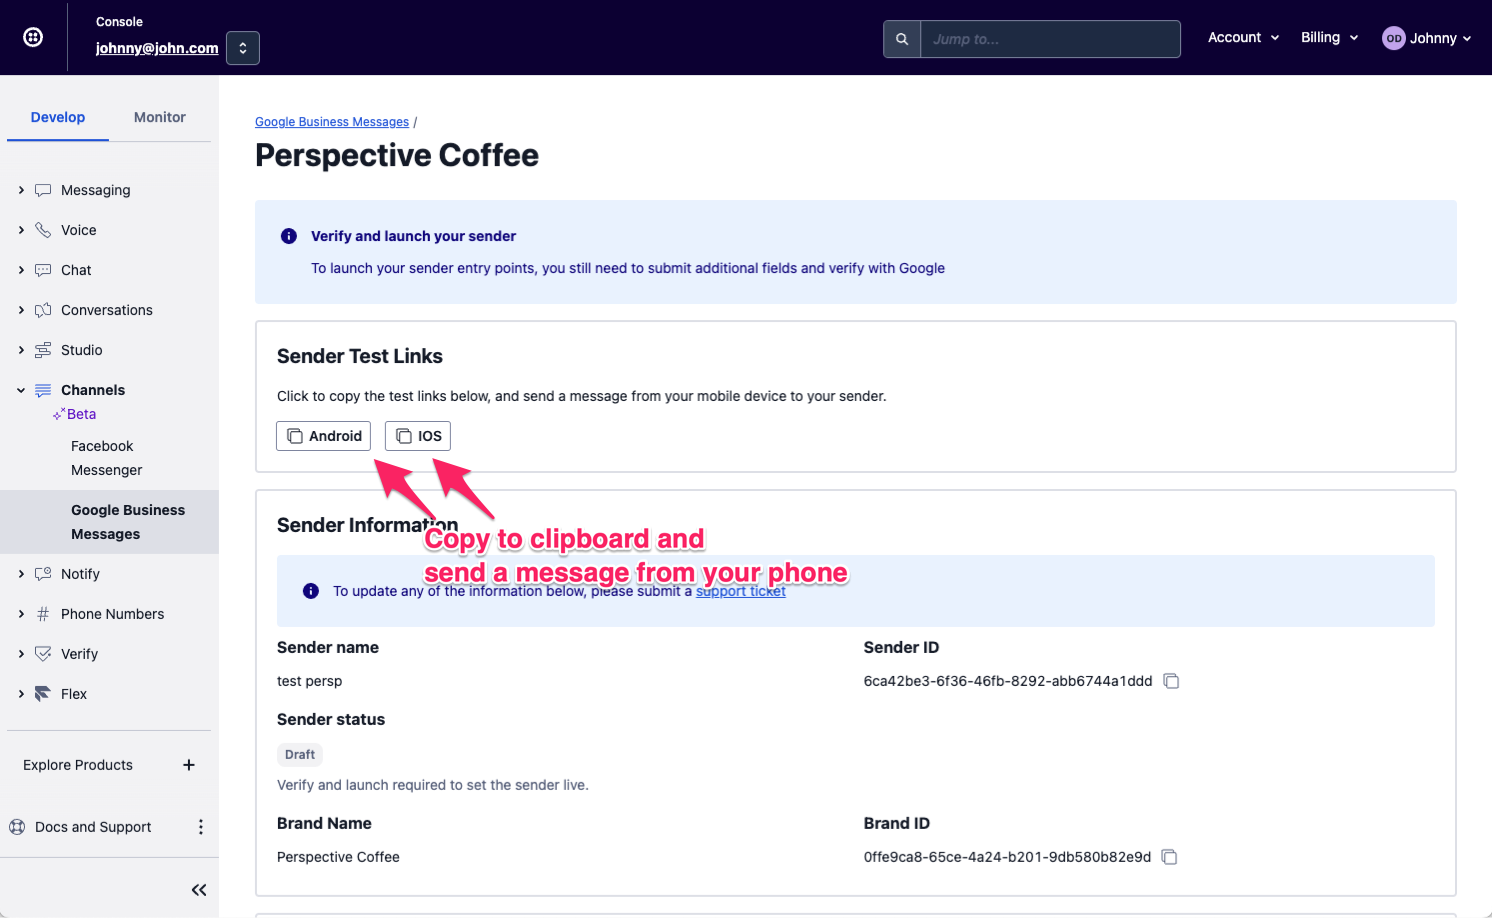
Immediately upon creating a GBM brand and sender, you will be redirected to the new sender's page. You can now test your sender! Access the "Sender Test Links" from your mobile device and you will be able to send your GBM sender a message.
Click to copy the links from the Console and access them from your phone. For example, you can send them to yourself in an email or WhatsApp message. From your phone, tap the link and send your agent a message.
To receive and respond to messages, you can use Conversations API, Programmable Messaging API or Twilio Flex.
Before you send your GBM sender a message, configure Twilio's Conversations API to create a new "conversation" each time a new user sends your business a message. Do this by creating an address configuration resource for your GBM sender and enabling the "auto-create" functionality. For example, using the CLI, run this command to automatically create a conversation when a new user sends a message to your GBM sender:
_10twilio api:conversations:v1:configuration:addresses:create --address gbm:{sender_ID} --type gbm --auto-creation.enabled
Learn more about GBM and Conversations API here.
Retrieve the GBM User ID from the Callback
When a user sends a message to your GBM sender, your callback URL will receive the message with the same parameters as a standard Twilio WhatsApp or SMS message. GBM senders and recipients have the format gbm:{sender_or_user_id}. You will need to retrieve the GBM user ID from the callback response. You can also find this information in the Logs ("Monitor" tab in Console > Logs > Messaging).
Respond using the Programmable Messaging API
To respond with a GBM message, make an HTTP POST request to Twilio's Programmable Messaging Message REST API resource. The "From" is your business' sender_ID, found in the Sender page in Console. The recipient is the end user's GBM user_ID from the callback. See the REST API: Sending a SMS or MMS or REST API: Messages page for details.
Once you have tested and configured your workflows, you can start the launch process. To launch, Twilio will ask you to submit a form so you can complete these steps:
- Give Twilio permission to message on behalf of your business.
- Request that Google verify the authenticity of your sender information. Once verified, your sender info, such as name and logo, will become locked.
- Specify any entry points where you want to launch (e.g. Google Maps). Twilio will still confirm with you prior to launching your entry points so that you can prepare for your launch.
To proceed, go to the Twilio Console > Channels > Google Business Messages > click on the sender you want to launch. Scroll to the bottom and click the "Verify sender" button. You will receive an email with a ticket where Twilio will respond with next steps. Your sender status will become "Pending Verification".

Twilio will share a form with you via email. In this form, you will need to provide the information below.
- Brand website URL: A working website representing the brand that users will interact with. If this website is later found to be non-functional, the sender may be disabled.
- Logo: Your sender's logo, as it will appear to users who are chatting with your sender. Please provide a 1024x1024 px image representing your brand. Make sure your logo displays well as a circle. Google accepts a JPEG, JPG or PNG file with max file size of 50KB. Files larger than this in size will be reduced in quality to comply with Google's requirements. You can request a screenshot of your sender before locking the logo.
- Privacy policy URL: Google requires a privacy policy working URL for the business. If this URL is later taken offline, your sender may be disabled.
- Phone number (optional): Your business contact number to provide a call option directly from the Business Messages interface.
- Brand employee contact: Name and email of an employee representative of the brand who can receive and respond to verification emails from Google. If you are an ISV or third party working on behalf of another brand, this must be the user-facing brand's contact.
Entry points are where the "chat" button shows up so users can start conversations with your sender. There are two types of entry points: Local, which is associated with Google Maps locations, and Non-local, which includes all other entry points such as Google Search, website and URL (refer to Google's documentation for more info).
You can provide as many entry points as you want in a single submission, but you must specify at least one entry point.
- Entry point types for sender: Indicate if you plan to launch Local, Non-local, or both entry point types.
- Location entry points (Local): Represented by a "Place ID", a unique identifier for a location in the Google Places database and on Google Maps. Find your Place ID here . Prior to launch, you will be required to verify any locations you submit.
-
Domain entry points (Non-local): List any domains to enable the sitelinks entry point, i.e. "https://twilio.com". Once launched, Google Search will show your sender when users search for your domain(s). Domains must be unique to each verified sender.
- "Contact Us" URL: If you launch a non-local entry point, Google requires a URL with contact info for your brand.
Specify language and welcome messages for your bot. These can be edited later upon request.
- Locale: Provide at least one default conversation locale such as en (English), es (Spanish) or pt-br (Brazilian Portuguese).
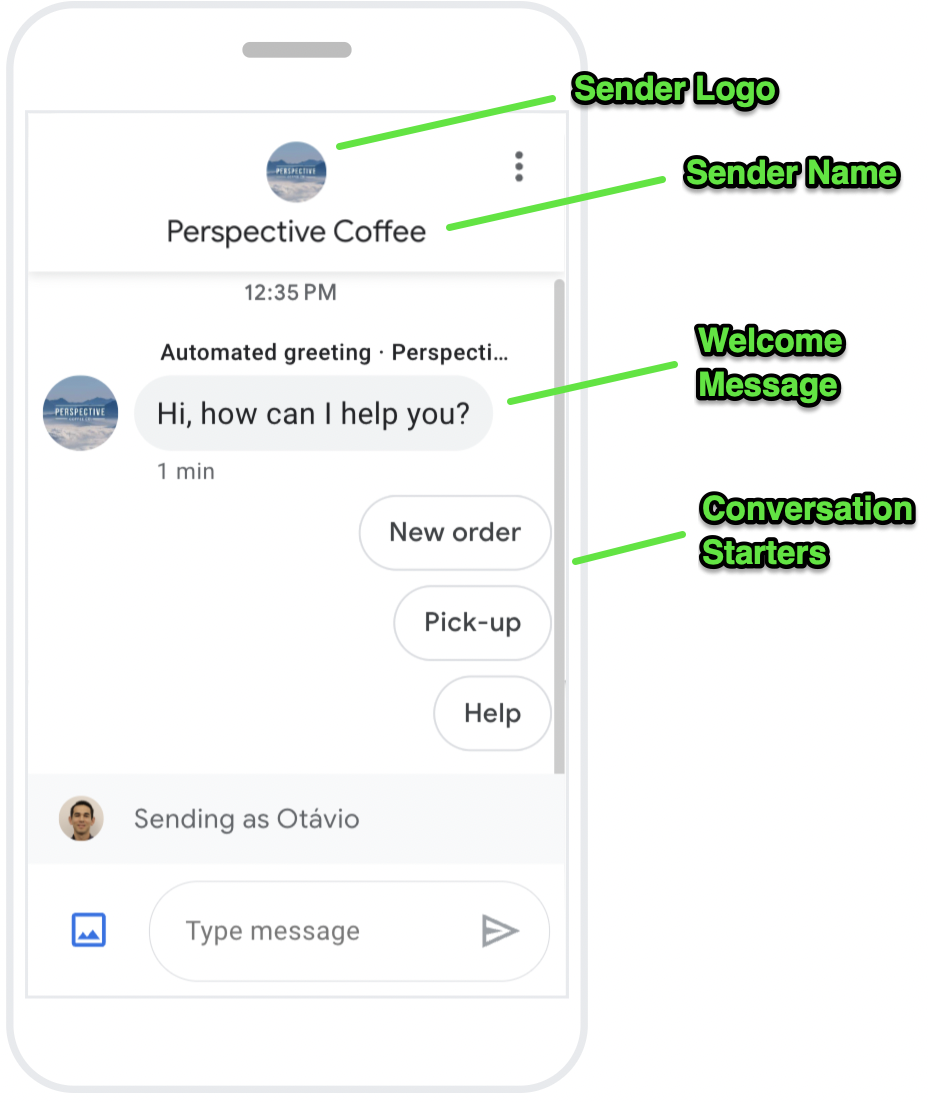
- Welcome message: Shows when a user starts an interaction with your sender - see screenshot below. If you specify multiple locales, please provide one message per locale.
- Conversation Starters (optional): Provide up to 5 quick reply messages that appear as vertically-stacked suggestions and directly follow the welcome message. Users can tap to respond. Max 35 characters per message.
- Offline message (optional) : If your sender is not available to respond 24/7, you can choose to provide a separate offline message. One message required per locale.
- Primary interaction type: Specify whether a bot or a human agent will address initial user queries.
- Availability: Specify whether the messaging agent will always be available or only during certain hours. Default option is "Always available". If the agent is only available during certain hours, please provide the available hours including days, hours and time zone.
After you submit the form (Step 3), Google will reach out via email to confirm the sender's info. Google reach out to the email contact from the brand that the sender represents. Google calls this "agent verification." The contact will receive two emails from Google and must respond:
- Email 1: Google will reach out with a one-time passcode
- Email 2: Google will request that you respond to an email with the one-time passcode and a statement confirming that you allow Twilio to message on your brand's behalf.
Once the brand contact responds to Google via email, the agent will be verified and ready to launch its entry points.
Warning
Google monitors the quality of each sender by monitoring feedback from end users who interact with it. Twilio recommends setting up a chatbot to provide prompt responses and clear escalation paths to end users.
After your sender is verified, it will be ready to launch by enabling entry points.
Twilio will confirm with you prior to launching entry points. Once the launch process begins, the sender will be available to users within a few hours. You should be ready to respond to user messages before you launch a sender.
If you need to cancel a location launch or unlaunch a live location, you can ask Twilio to mark the location as unlaunched. If the location was in a pending launch state, this cancels the location launch. If the location was launched, this removes the location from all configured entry points.